

Smooth and deliciously aromatic Cardamom Buns which is able to fill your house with the aroma of a Danish bakery! Recipe with step-by-step pictures.

Cardamom Buns
I’m an enormous fan of Scandinavian design, however maybe an excellent greater fan of Scandinavian baking. We’re lucky to have the ability to journey to Denmark and Sweden recurrently, and my favorite pastime once we are there may be to go to all of my favorite cafés and bakeries, plus any new ones which have popped up since our earlier go to. Excessive on the agenda is to squeeze in as many Cinnamon Buns and Cardamom Buns every day at breakfast!

What are Cardamom Buns?
Cardamom Buns are sometimes bought alongside Swedish Cinnamon Buns, and they’re often formed in a different way so you possibly can inform them aside. The primary distinction is that they’re heady with freshly-ground cardamom which has a barely peppery style and a ravishing floral aroma.
Cardamom may be an acquired style for some, however the benefit of creating home made Cardamom Buns is that you could add as a lot, or as little, cardamom as you want (I like to make use of rather a lot!).
I’ve heard that Cardamom Buns are extra for adults, that children in Sweden and Denmark often choose Cinnamon Buns. However my youngsters occur to like these Cardamom Buns as a lot as I do, and they’re going to eat them with the utmost quantity of cardamom that the recipe beneath requires.


Cardamom Pods vs Cardamom Seeds
When you have ever tasted a recent cardamom bun from a bakery in Sweden or Denmark, you’ll often discover the distinct perfume of cardamom straight away, evidenced by the flecks of freshly-ground cardamom on prime of the buns. They seem like coarsely floor black pepper, however they’re in actual fact floor cardamom seeds.
When making cardamom buns, I like to recommend utilizing complete cardamom seeds which have already been extracted from the cardamom pods (additionally known as decorticated cardamom seeds). When you can’t discover cardamom seeds, you possibly can take away the seeds from the cardamom pods themselves by pounding them open with a pestle and mortar. Nevertheless, this course of may be fairly fiddly and time-consuming.
The cardamom seeds themselves are too giant and coarse to make use of straight away, so you have to to grind them coarsely, both with a pestle and mortar or an electrical spice grinder. Some Danish households actually have a devoted spice grinder for cardamom seeds, a tip which I’ve adopted since I exploit freshly-ground cardamom seeds fairly recurrently.
In case you are out of luck and may’t discover neither cardamom pods nor cardamom seeds, you need to use floor cardamom which is extra available. Nevertheless, store-bought floor cardamom is nowhere close to as aromatic and punchy as freshly floor cardamom – you’ll scent and style the distinction straight away.
When you decide to make use of store-bought floor cardamom on this recipe, I like to recommend including an additional 1-2 teaspoons to extend the cardamom flavour.

Cardamom Bun Recipe
My Cardamom Bun recipe is much like my recipe for Swedish Cinnamon Buns, in addition to my different recipes which use an enriched dough, comparable to Finger Buns, Cream Buns, Cinnamon Rolls, and so on.
It’s an straightforward and dependable dough recipe which produces smooth and fluffy buns every time.
The best way to Make Cardamom Buns
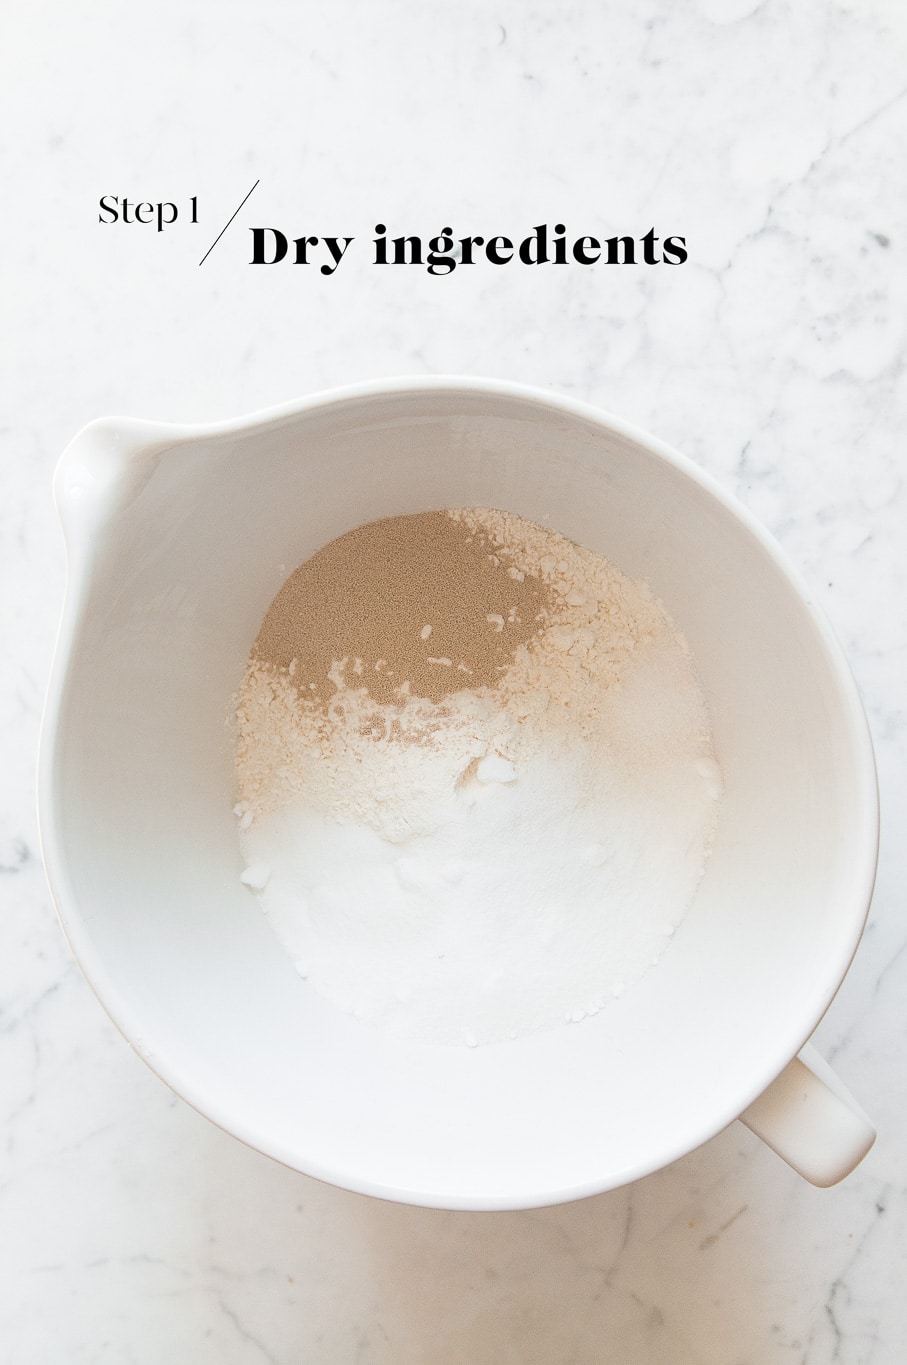
Step 1
Measure the flour, sugar, yeast and salt into the bowl of an electrical stand mixer. Calmly combine the elements collectively.
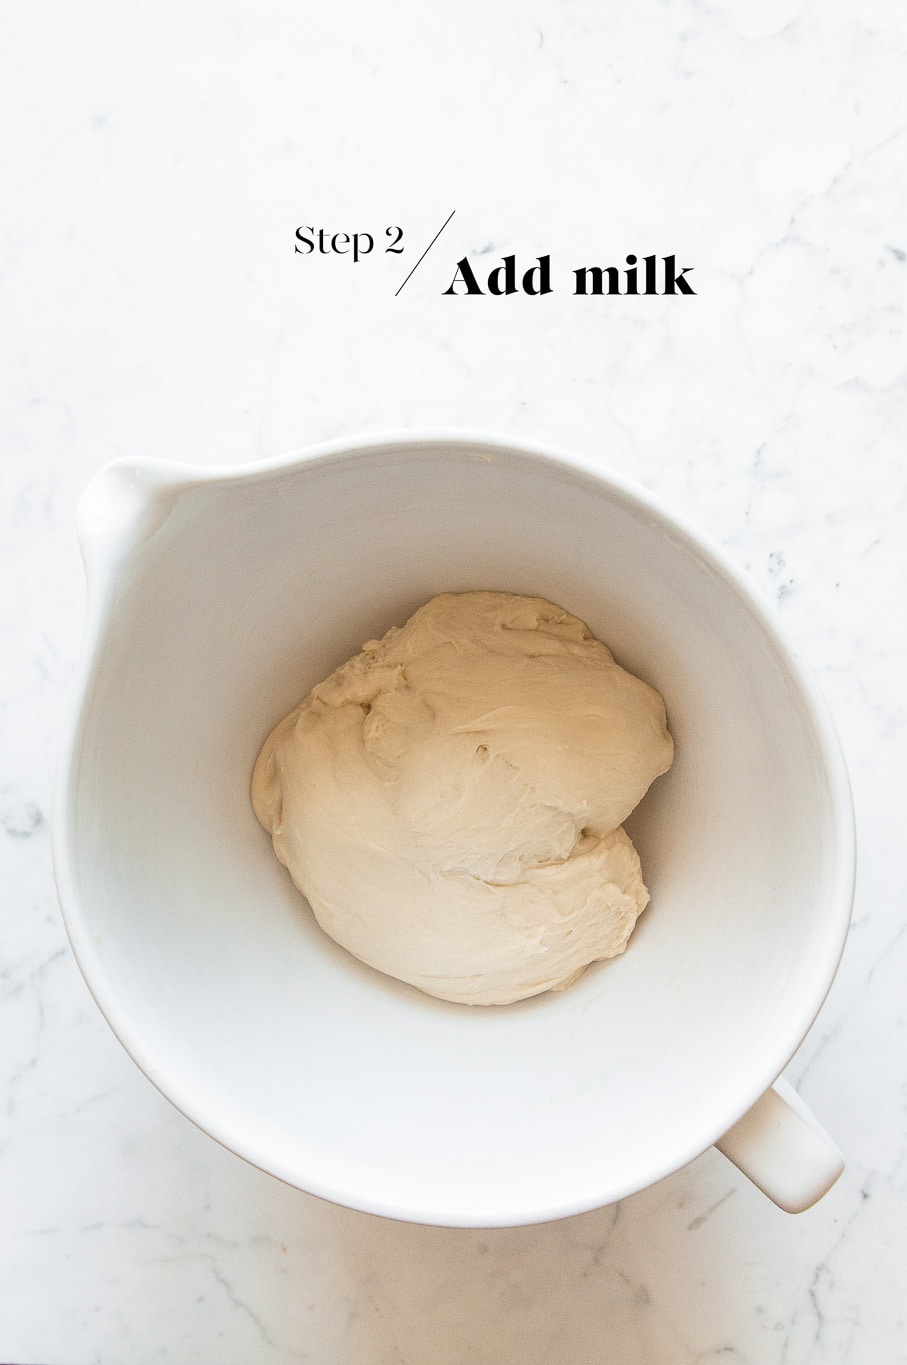
Step 2
Slowly add the nice and cozy milk (you could not want all of it), and flippantly beat all the things with the dough hook till it comes collectively into a big ball of dough. Solely add as a lot milk as you want to carry the elements collectively right into a dough.
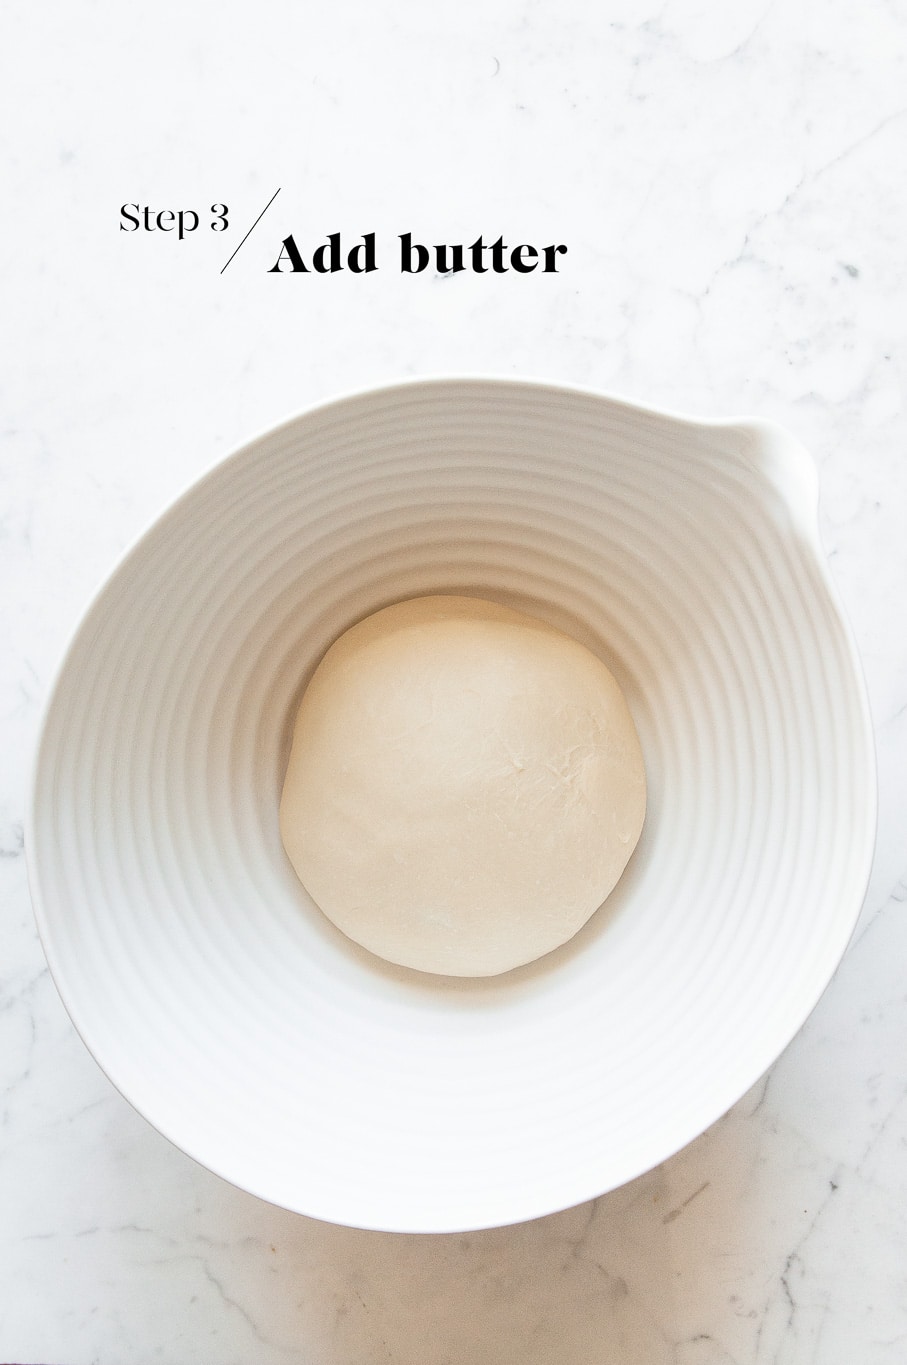
Step 3
Slowly incorporate the butter, one tablespoon at a time, till all the butter has been used.
Then enhance the pace to medium and proceed kneading with the dough hook for 15 to twenty minutes, or till the dough is easy and elastic.
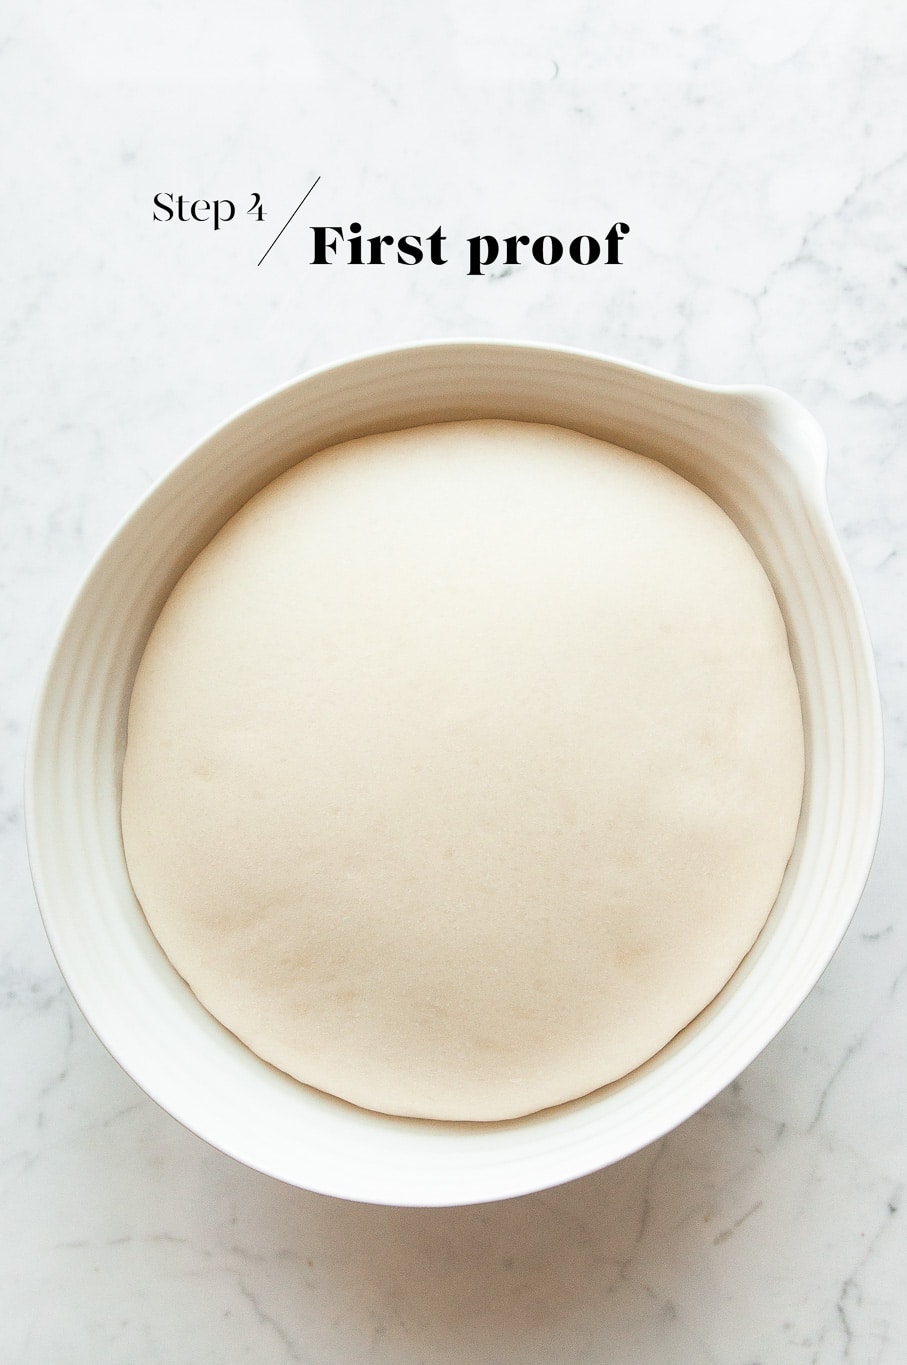
Step 4
Calmly oil a big mixing bowl, and place the dough into the bowl. Cowl the bowl with a clear tea towel and depart it someplace heat for 1 to 1.5 hours, or till the dough has doubled in measurement.
Step 5
As soon as the dough has doubled in measurement, gently take away the dough from the bowl. The dough will deflate as you deal with it.
Roll out the dough right into a rectangle form measuring roughly 50 x 40 cm/20 x 16 inches.
Step 6
Make the filling by beating collectively the elements. Use a small palette knife to evenly unfold the filling over one half of the dough.


Step 7
Fold the dough over in half. It’s best to have an oblong form measuring roughly 50 x 20 cm/20 x 8 inches.
Step 8
Minimize the dough into skinny strips measuring 1 cm/0.5 inch extensive. It’s best to have about 16 strips, however it will rely upon how extensive you rolled your dough. Every strip will produce one bun.


Step 9
Form the Cardamom Buns as follows:
- Take one strip of dough.
- Gently wrap the dough round 4 fingers on one hand.
- As you come to the tip of the strip of dough, gently loosen the wrapped dough out of your fingers.
- Deliver the tip of the strip of dough throughout the center of the bun, after which tuck it in securely beneath.
After getting formed just a few buns, you’ll get a really feel for when it is best to begin to end and safe the buns.
Attempt to work rapidly because the dough will begin to puff up barely because it sits, making it a bit tougher to work with.

Step 10
Place the formed dough on a sheet pan lined with baking paper. House them aside generously. Set the pan apart someplace heat till the buns have overvalued barely. The timing will rely upon how heat your room is (about 30-60 minutes). It’s important that the room is just not too heat, in any other case the butter from the filling will soften.
In the meantime, preheat the oven to 200°C/390°F with a metallic baking tray on the center shelf.
Step 11
Brush the buns with egg wash, and sprinkle generously with the cardamom sugar topping.


Step 12
Bake the buns for about 20 minutes, or till the buns are flippantly golden. Examine the buns at about 10 minutes, and if they’re browning too rapidly, cowl them with a unfastened sheet of foil for the remainder of the baking time.
The buns are cooked if an inner thermometer reads 85°C (185°F). Gently take away the buns (intact) to a wire rack, and depart them to chill utterly.

Suggestions for Making Cardamom Buns
- The longer the strips of dough, the extra “layers” of cardamom sugar you should have within the bun, which may also make the buns look nicer.
- In an effort to stop the butter within the filling from melting and leaking throughout baking, it is very important do the second proofing in a heat, however not too heat, surroundings. That’s, it must be heat sufficient to encourage the buns to rise, however not so heat that the butter within the filling will soften.
- Because the buns are historically baked spaced aside, they won’t be smooth and fluffy on the skin of the bun.
- To make the buns as smooth as attainable, I prefer to bake them till they’re simply barely golden, earlier than masking them with foil for the remainder of the baking time.
- Some butter (however not rather a lot) will leak and soften throughout baking, and that is regular. The melted butter and sugar will pool somewhat underneath every bun, and caramelise throughout baking. You possibly can break off the caramelised bits or depart them on the buns.
Suggestions for Making Bread Dough Forward of Time
I like baking bread, however I don’t love getting up further early to get began on the dough. So I usually make the dough the night time earlier than and permit it to rise slowly within the fridge in a single day. The longer proofing time has the additional benefit of permitting the dough to develop extra flavour and a greater texture. Come the morning, the dough could have no less than doubled in measurement, and it is going to be prepared for shaping as per the recipe.
To make the dough the night time earlier than:
- Make the dough as per the recipe.
- Place the dough into a big oiled bowl.
- Cowl the bowl with plastic wrap or a reusable bowl cowl.
- Place the bowl into the fridge.
- Let the dough rise in a single day, or for no less than 8-10 hours.
- The following morning, the dough ought to have no less than doubled in measurement.
- Gently take away the dough from the bowl.
- The dough is prepared for shaping and the second proof as per the recipe.
- Because the dough will probably be chilly from the fridge, the second proof might take barely longer.
The place to Purchase Cardamom Buns
In case you are travelling to Copenhagen or Stockholm, I extremely suggest visiting the next locations for an excellent cup of espresso and a few pastries, together with Cardamom Buns:
Juno the Bakery, Copenhagen
Andersen & Maillard, Copenhagen
Lille Bakery, Copenhagen
Hart Bageri, Copenhagen
Fabrique, Stockholm (additionally in London and New York)
Bageri Petrus, Stockholm
Café Pascal, Stockholm
Lillebrors Bageri, Stockholm
Cardamom Buns

- Resting Time: 2 hours
- Prep Time: 60 minutes
- Prepare dinner Time: 20 minutes
- Whole Time: 1 hour 20 minutes
- Yield: Makes about 16 buns
- Class: Bread
- Methodology: Oven
- Delicacies: Scandinavian
Smooth and deliciously aromatic Cardamom Buns which is able to fill your house with the aroma of a Danish bakery! Recipe with step-by-step pictures.
Substances
For the Dough
- 600 g (4 cups) white bread flour
- 110 g (1/2 cup) caster sugar
- 1 teaspoon high quality salt
- 14 g prompt dried yeast (see Kitchen Notes beneath)
- 375 ml (1 1/2 cup) milk, warmed to 37°C/98°F
- 60 g (4 tablespoons) unsalted butter, softened
For the Cardamom-Sugar Filling
For the Topping
Directions
You will have approx. 3 hours to make the Swedish Cinnamon Buns
To Make the Dough
- Measure the flour, sugar, salt and yeast into the bowl of an electrical stand mixer.
- Calmly combine the elements collectively utilizing the dough hook.
- Slowly pour within the heat milk, and proceed mixing till all the things comes collectively right into a tough dough.
- Add the butter, one tablespoon at a time. As soon as the butter has been absolutely included into the dough, add the subsequent tablespoon of butter.
- As soon as all the butter has been added, proceed kneading the dough on medium pace for about 15 to twenty minutes.
- The dough is prepared when it’s smooth and easy, and not sticks to the facet of the bowl. The dough will probably be considerably sticky from the butter.
First Proofing Interval
- Calmly oil a big mixing bowl.
- Place the dough contained in the bowl.
- Cowl the dough with a clear tea towel, plastic wrap, or a reusable bowl cowl.
- Go away the dough someplace heat for 1 to 1.5 hours, or till the dough has doubled in measurement (see Kitchen Notes beneath).
For the Cardamom-Sugar Filling
- Simply earlier than the dough has completed the primary proofing interval, make the filling by beating collectively the elements.
To Roll out the Dough
- As soon as the dough has doubled in measurement, gently take away the dough from the bowl. The dough will deflate as you deal with it.
- Roll out the dough right into a rectangle form measuring roughly 40 x 30 cm/16 x 12 inches.
- Use a small palette knife to evenly unfold the cardamom-sugar filling all around the dough.
- Fold over one-third of the dough in direction of the centre, and overlap with the opposite third of the dough.
- Use a rolling pin to softly flatten the dough and easy out any air bubbles. Purpose to have a rectangle form measuring roughly 30 x 15 cm/12 x 6 inches.
- Minimize the dough into strips measuring 2 cm/0.75 inches extensive. What number of strips you chop will rely upon how extensive you could have rolled your dough, however it is best to get about 12-15 strips.
To Form the Cardamom Buns
- Take one strip of dough and twist it gently with each palms, barely stretching the dough as you achieve this.
- For right-handers: begin wrapping the twisted dough round three of your fingers in your left hand.
- End the knot by tucking the tip of the dough into the centre of the bun on prime. Please see diagram in weblog put up.
Second Proofing Interval
- Line a big baking pan with baking paper.
- Organize the formed buns on the lined baking pan. House the buns aside generously.
- Place the pan someplace heat for about half-hour, or till the buns have risen and overvalued barely.
- Throughout this time, preheat the oven to 200°C/390°F (with out fan) with a metallic baking tray on the center shelf.
Bake the Cardamom Buns
- Gently brush every bun with some egg wash.
- Combine collectively the sugar and freshly floor cardamom.
- Sprinkle every bun with a number of the cardamom-sugar.
- Place the pan of buns on the preheated baking tray.
- Bake the buns for about 20 minutes, or till the buns are flippantly golden. Examine the buns at about 10 minutes, and if they’re browning too rapidly, cowl them with a unfastened sheet of foil for the remainder of the baking time.
- The buns are cooked if an inner thermometer reads 85°C/185°F.
- Gently take away the buns to a wire rack, and depart them to chill utterly.
Kitchen Notes
 WHAT TYPE OF CARDAMOM TO USE
* For the most effective (and most genuine) outcomes, use freshly-ground cardamom seeds (additionally known as decorticated cardamom seeds). Merely grind them to a high quality powder to make use of within the dough and filling. Use a extra coarse grind for sprinkling on prime of the wreath.
* Alternatively, use the same amount of normal floor cardamom, or add extra to style.
 MAKE AHEAD TIPS
To start out the dough the night time earlier than, make the dough as per the recipe. Place the bowl of dough (coated) within the fridge to proof in a single day, or for no less than 8 to 10 hours. Throughout this time, it ought to have no less than doubled in measurement. The following day, proceed with the remainder of the recipe. Because the dough will probably be chilly, it could require a bit extra time for the second proofing interval.
 DIFFERENT TYPES OF FLOUR
* For Swiss readers: I exploit Zopfmehl (or farine pour tresse) when making bread and enriched dough.
 DIFFERENT TYPES OF YEAST
* Please observe that there’s a distinction between prompt yeast (additionally known as prompt dried yeast or fast-action dried yeast) and dried yeast (additionally known as lively dry yeast). In case you are unsure what kind of yeast you could have, please test the packaging for directions on the right way to use the yeast.
* With prompt yeast, you possibly can add it on to the flour combination with out having to activate it first.
* With dried yeast, you have to to activate it first (often in some heat liquid).
* In case you are utilizing recent yeast, you have to about 1 block (40 g recent yeast = 14 g prompt dried yeast). Crumble the recent yeast into the nice and cozy milk, and stir to dissolve the yeast.
 PROOFING THE DOUGH
Dough wants a heat surroundings for the yeast to activate and trigger the dough to rise. When you don’t have an oven with a setting to proof dough, or a heat place in your house, strive one of many following concepts:
* Within the oven with the oven gentle switched on (works just for some ovens).
* Within the oven with a tray of boiling water on the underside shelf.
* Within the oven or a steamer oven at a low temperature of about 25-40°C (77-104°F).
 OVEN & STOVE TEMPERATURES
All recipes on this web site have been examined on an induction range and/or with a typical oven (i.e. an oven with out fan). All recipes on this web site use temperatures for a traditional oven, except in any other case talked about. Convection ovens (i.e. fan-forced ovens) are usually 20°C/70°F hotter than typical ovens, however please test your producer’s handbook.
 CONVERSIONS
To transform from cups to grams, and vice-versa, please see this useful Conversion Chart for Fundamental Substances.