

A basic Focaccia with Rosemary and Sea Salt which is ideal for appetisers or sandwiches. Recipe with step-by-step images for making a focaccia in a cast-iron skillet or in a baking pan.

Focaccia Bread
After I lived in Australia, focaccia was a staple which was offered in all bakeries and supermarkets. So once I first moved to Switzerland practically 20 years in the past, I used to be shocked that, regardless of being subsequent door to Italy, no focaccia bread may very well be present in sight.
So I set about making my very own focaccia at house. It was in all probability the primary time I had made bread at house, and simply as effectively as a result of it’s the best bread you can also make. There isn’t any requirement to knead the dough (nice for many who don’t have robust wrists or an electrical stand mixer), and the toppings are countless. I like to make my Focaccia with Herbs and Olives at any time when I serve a grazing board with numerous cheeses and cured meats 🙂
What’s Focaccia?
Focaccia is a yeasted flat bread which originates from Italy.
It’s related in style and texture to a pizza base, however it’s usually thicker and softer than a pizza dough. Though, you can use the focaccia dough to make a really smooth and thick pizza dough.
Focaccia is often served as a starter or appetiser, and my household likes it finest served straight from the oven when the crust remains to be heat and crispy. Any leftover focaccia may be sliced horizontally to make sandwiches.

Focaccia Recipe
Usually when now we have associates over for dinner, I like to show to this focaccia recipe for a straightforward starter or appetiser. Though I might describe this focaccia recipe as simple, there are a number of steps concerned if you wish to obtain the very best texture.
I occur to suppose the best method of creating focaccia is to start out the night time earlier than, which is able to mean you can break down the steps and cut up the proofing time over 2 days. Please scroll all the way down to see my steps my making focaccia in a single day.
Having experimented with many focaccia recipes over time, I’ve discovered that bread recipes with not less than 80% hydration give the very best outcomes for a focaccia dough. This implies the dough might be fairly moist and sticky, however the moisture content material means a smooth and chewy bread with simply the correct quantity of air bubbles.

Stretching and Folding the Dough
For a “regular” bread dough which yields a smooth ball of dough, you must knead the dough to develop the gluten, which is what offers you the great chewy texture of bread.
However for a moist bread dough, like this focaccia dough or a No-Knead Bread, which is inconceivable to knead, you as a substitute stretch and fold the dough to activate the gluten. And the extra usually you stretch and fold, the higher the feel the ensuing bread might be. Therefore, this recipe requires 3 rounds of stretching and folding, though every spherical solely requires about 1 minute of your time.
I’ve seen many focaccia recipes the place no stretching is carried out in any respect – the dough is just combined collectively, left to proof, after which transferred to the baking dish earlier than dimpling and baking. I’ve tried this technique too, and while you’ll be able to produce an honest loaf of focaccia with completely minimal effort, I do truly suppose spending a couple of minutes to stretch and fold the dough makes a distinction to the ultimate outcome. Focaccia recipes which don’t name for any stretching or folding usually produce a dough which is denser and with few air bubbles.
On these events the place I stretch and fold the dough, I’ve discovered that the dough holds its form higher, that means a taller bread which is smooth and pillowy, and with extra air bubbles.

How you can Make Focaccia
Step 1
Place the entire dry substances into a big mixing bowl. Combine evenly.
Step 2
Add the water and oil, and blend till the entire flour is hydrated with the water. I choose to do that utilizing my electrical stand mixer with dough hook, however you may also use a big wood spoon. The dough must be fairly moist in texture.
Cowl the bowl and place it someplace heat for about quarter-hour to proof.


Step 3
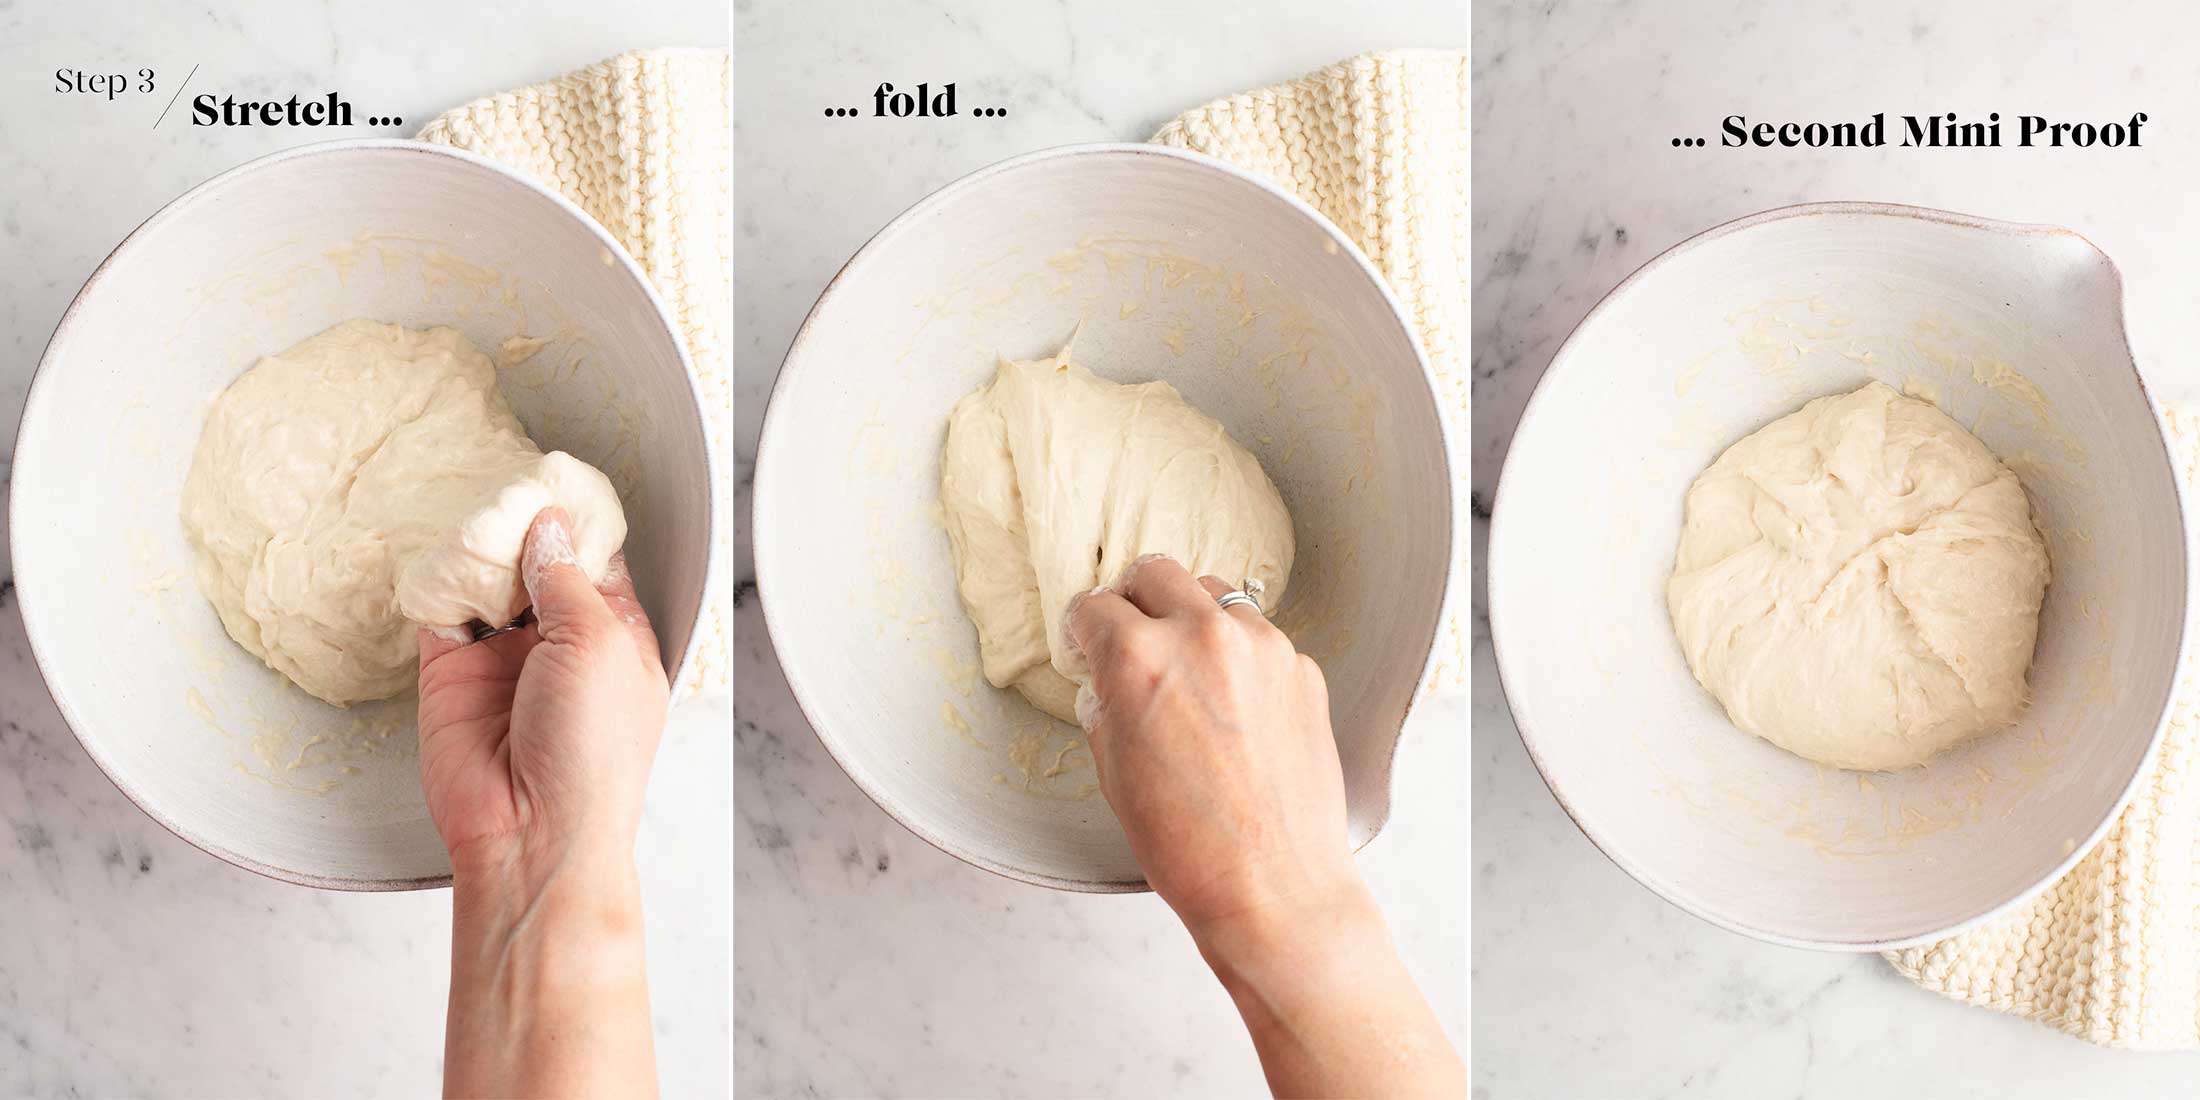
Moist your fingers, and use one hand to carry up one fringe of the dough, stretching it upwards, earlier than folding it in direction of the centre. Repeat with the entire edges of the dough, rotating the bowl as you go, and till you’ll be able to loosely type a ball of moist dough within the bowl.
Cowl the dough and place it someplace heat for an additional quarter-hour.
Step 4
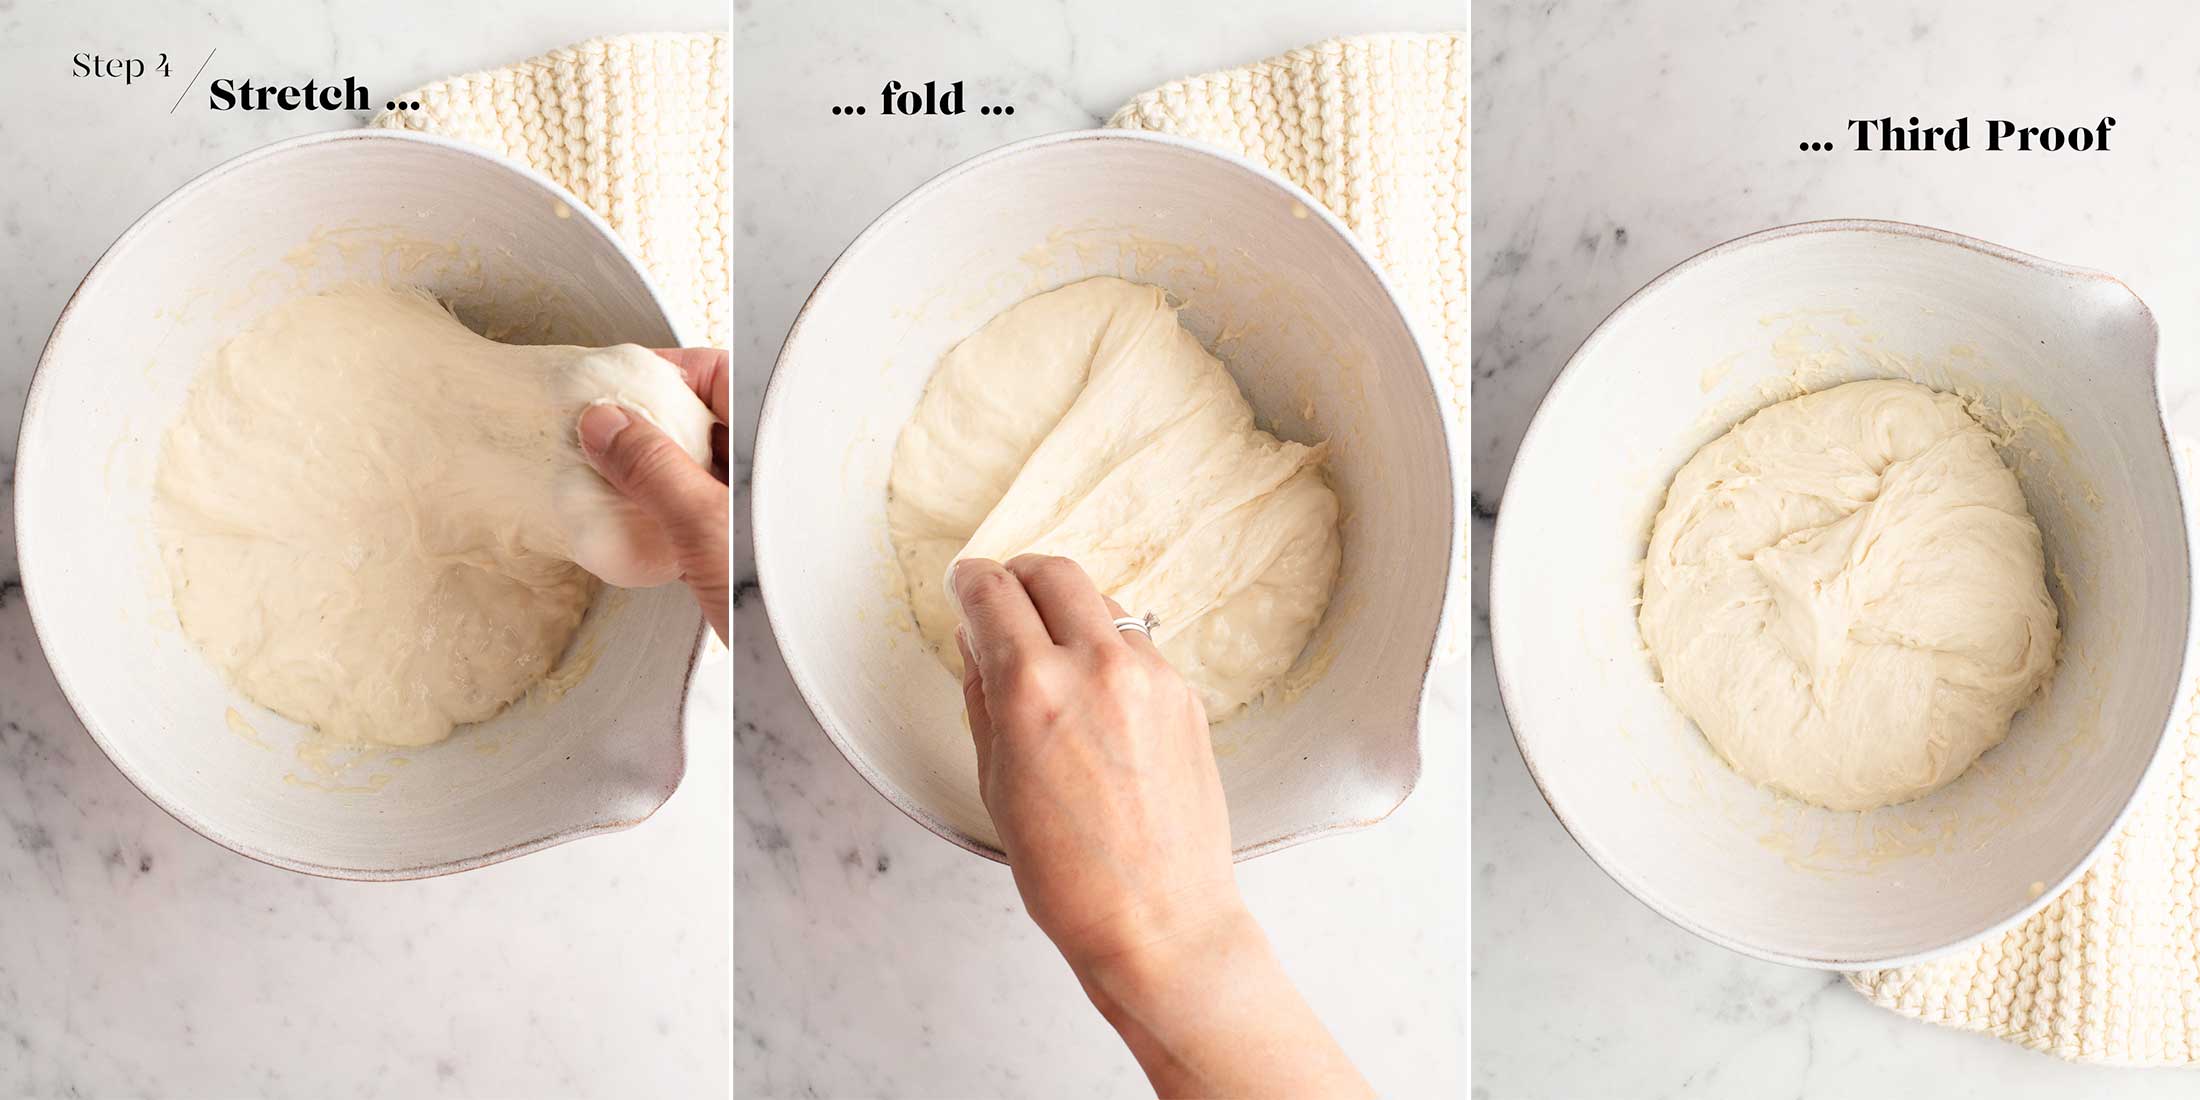
By now, the dough ought to have risen a bit.
Repeat the stretching and folding technique talked about in Step 3. The dough ought to really feel extra agency and elastic by now, so it must be simpler to stretch and fold at this stage.
Cowl the bowl and place it someplace heat for 1 to 1.5 hours, or till the dough has doubled in dimension.
Step 5
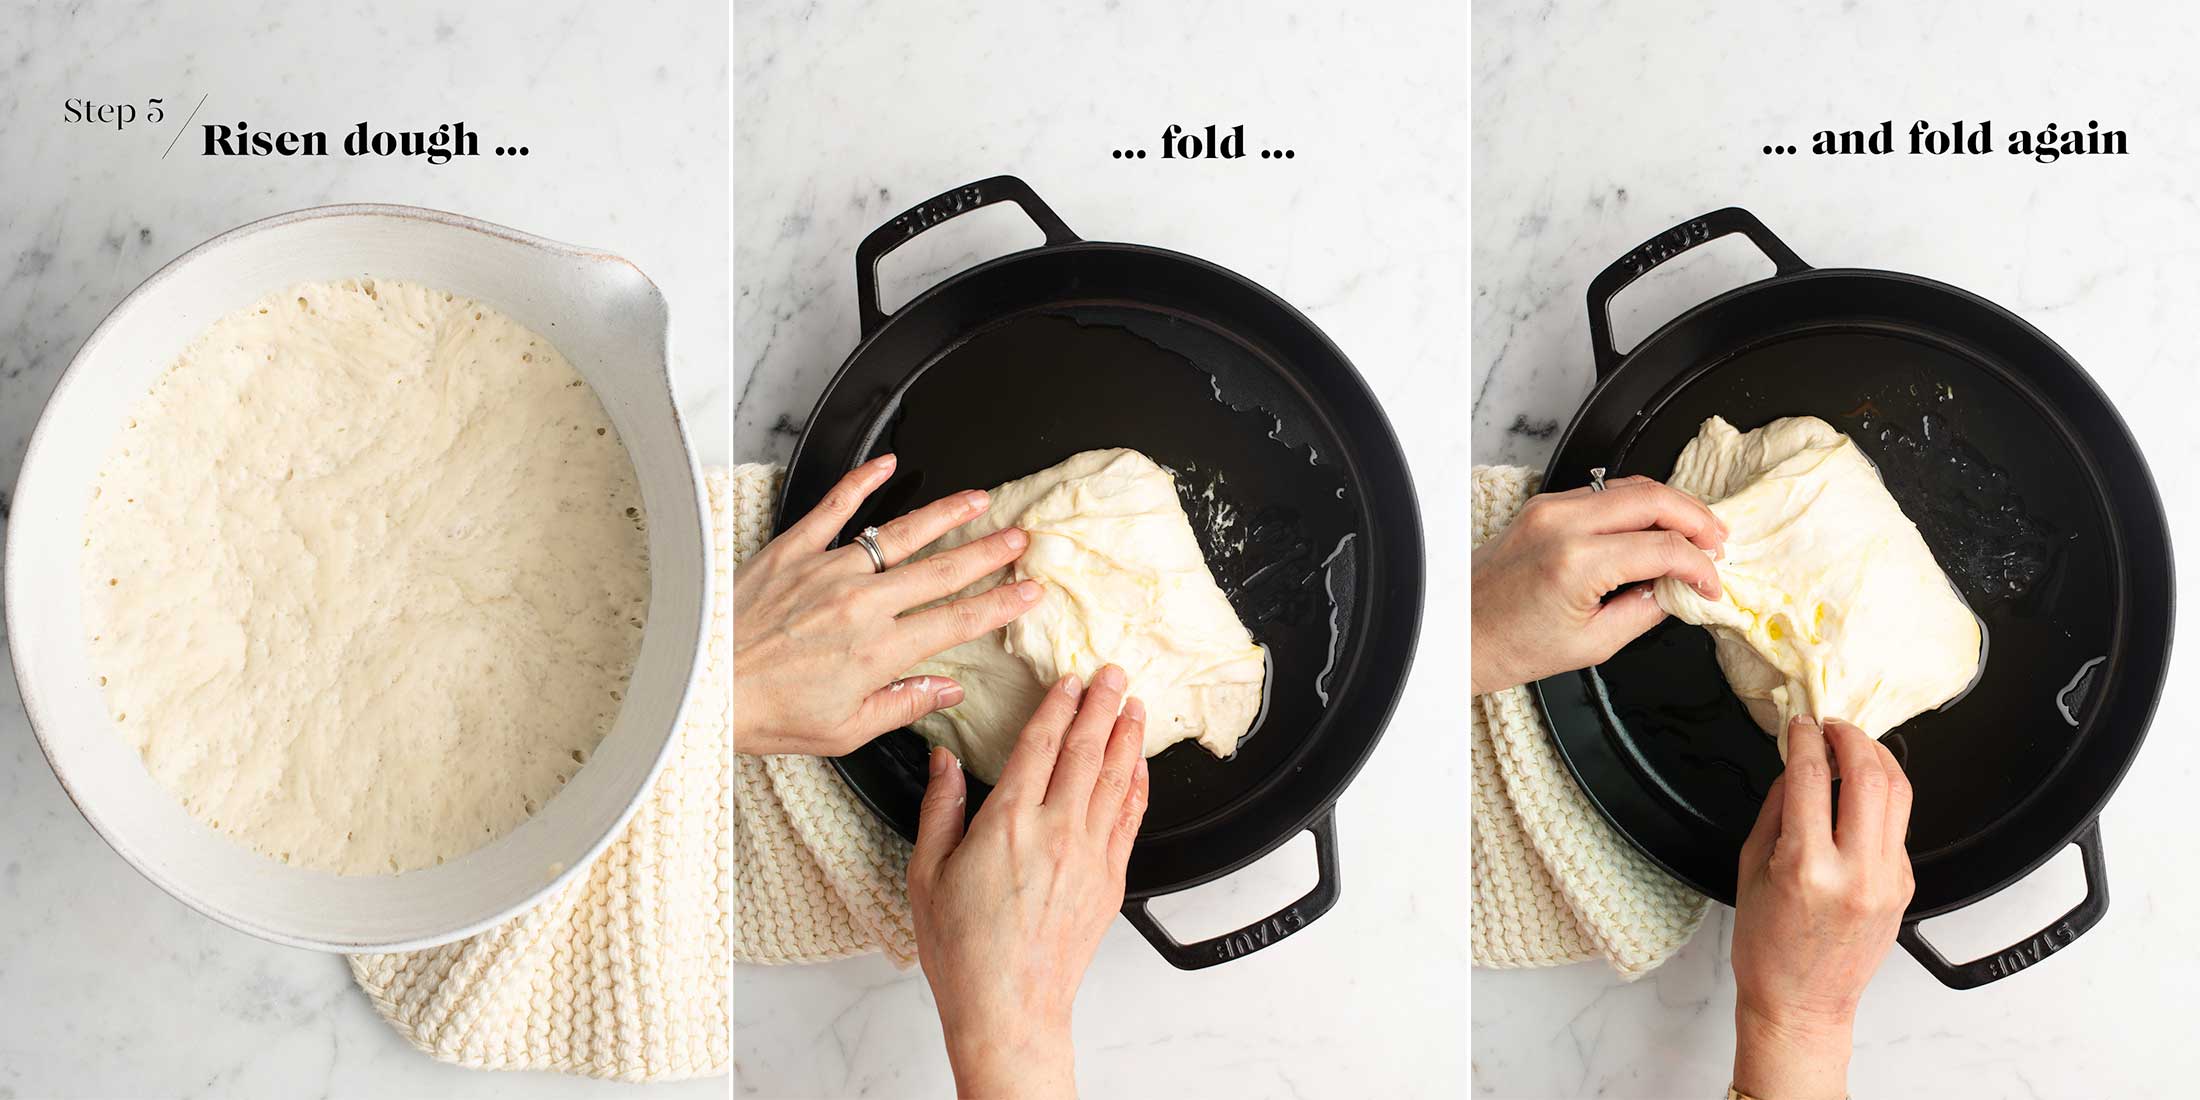
Drizzle 2-3 tablespoons of olive oil onto a non-stick baking tray or cast-iron skillet.
For a rectangular focaccia, I take advantage of a baking tray which measures 23 x 33 x 5 cm/9 x 13 x 2 inches (see extra in Kitchen Notes beneath).
For a spherical focaccia, I take advantage of a cast-iron skillet which is 26 cm/10 inches in diameter.
Use a spatula to switch the dough onto the pan, however attempt to not deflate the dough.
Moist your fingers after which fold the dough like an envelope, i.e. fold the highest third down in direction of the centre of the dough, after which fold the underside third up in direction of the centre.
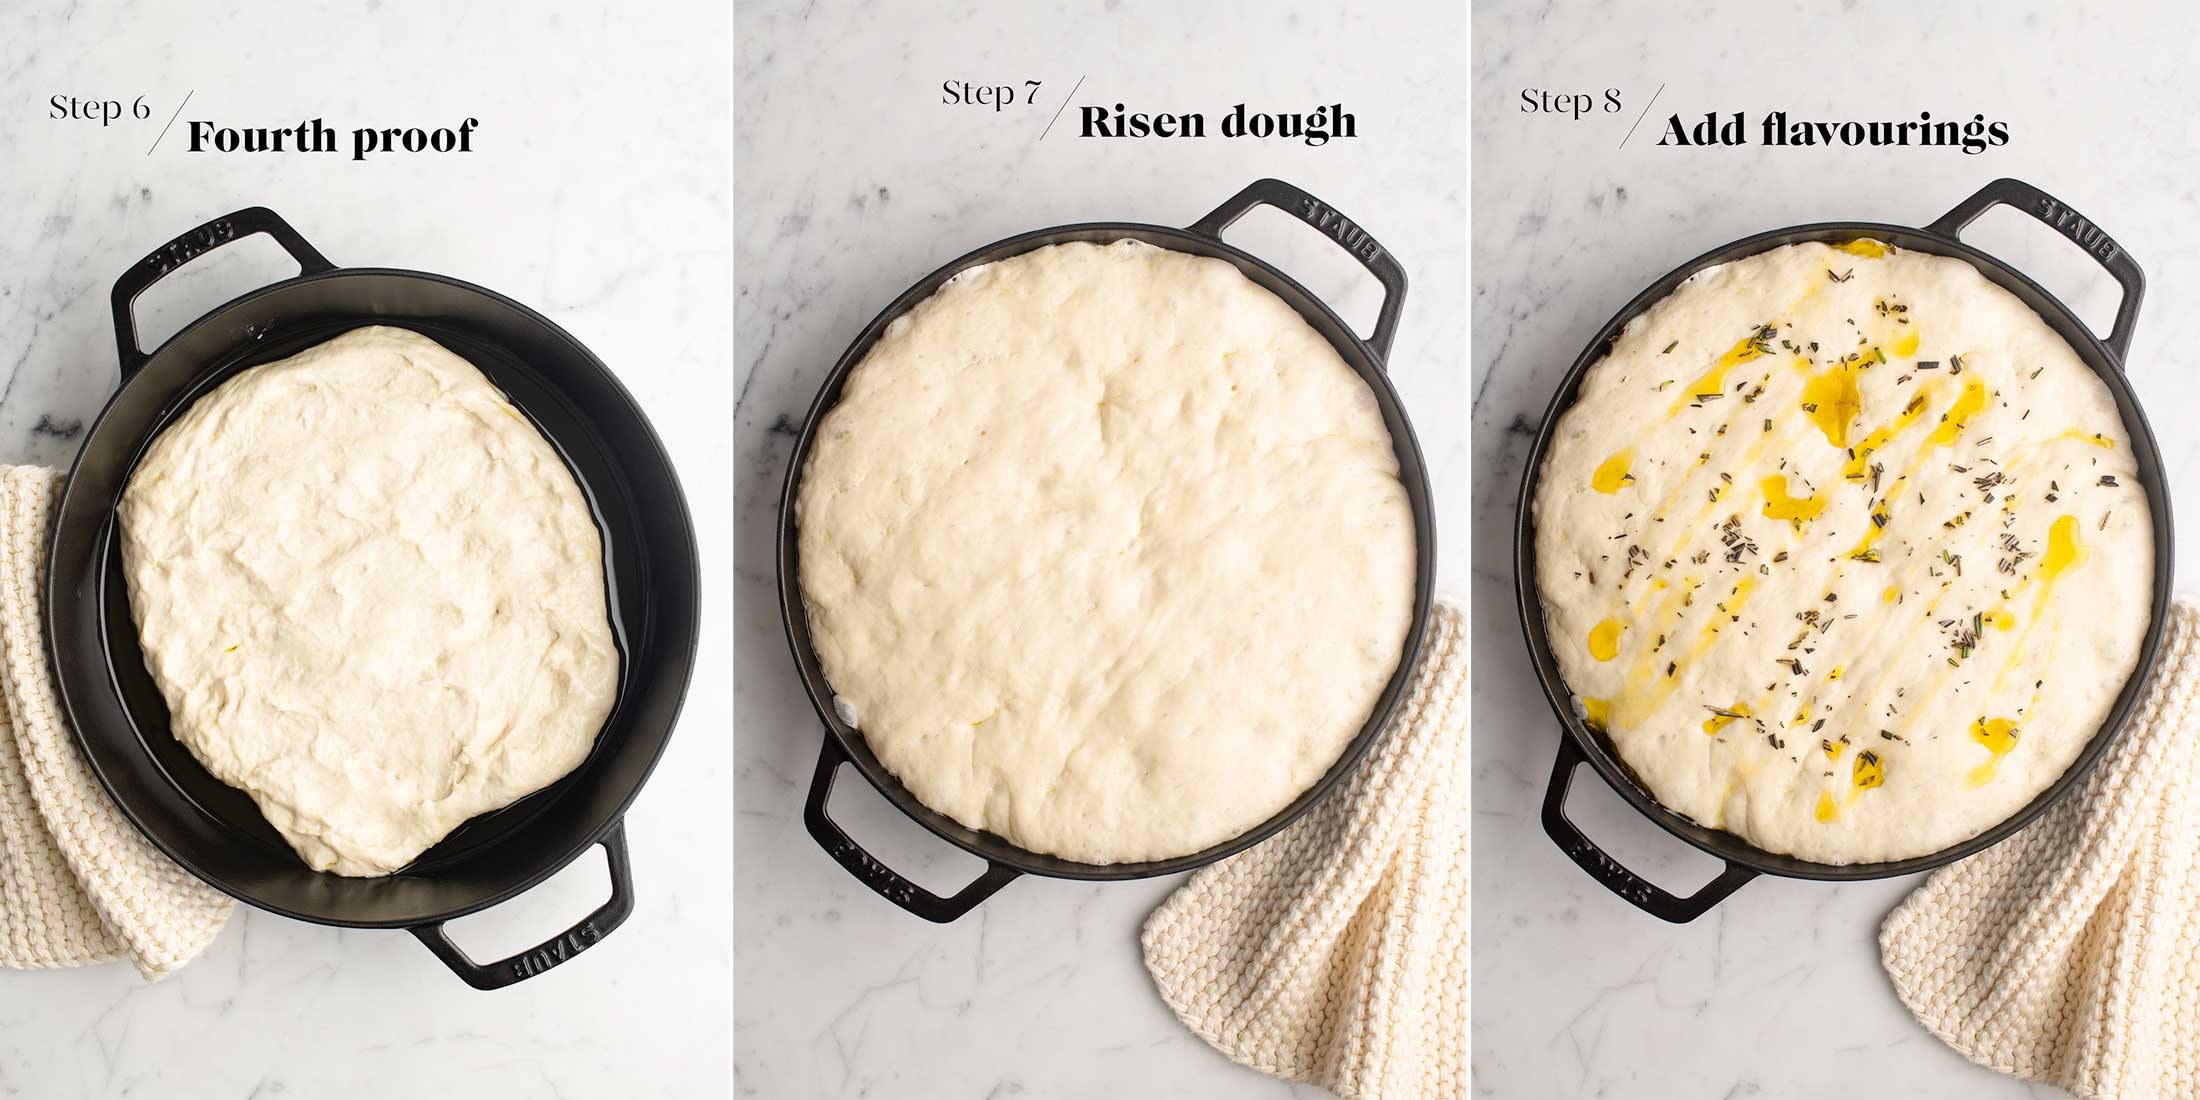
Step 6
Rigorously flip the dough in order that the seam is going through down. If you’re utilizing an oblong baking tray, rotate the dough in order that the lengthy facet of the dough is following the size of the baking tray. Gently push out the dough together with your fingertips in order that it fills a lot of the baking tray.
Step 7
Cowl the tray with a clear tea towel or sheet of baking paper, and place the tray someplace heat for about 1 to 1.5 hours, or till the dough has risen to nearly the highest of the tray, and it has stuffed the whole baking tray with numerous massive air bubbles.
At this stage, deal with the tray evenly and delicately in order to not deflate the air bubbles which you could have waited so patiently to type.
Step 8
Preheat the oven to 220°C/430°F (with out fan). Place a steel tray in the course of the oven to preheat.
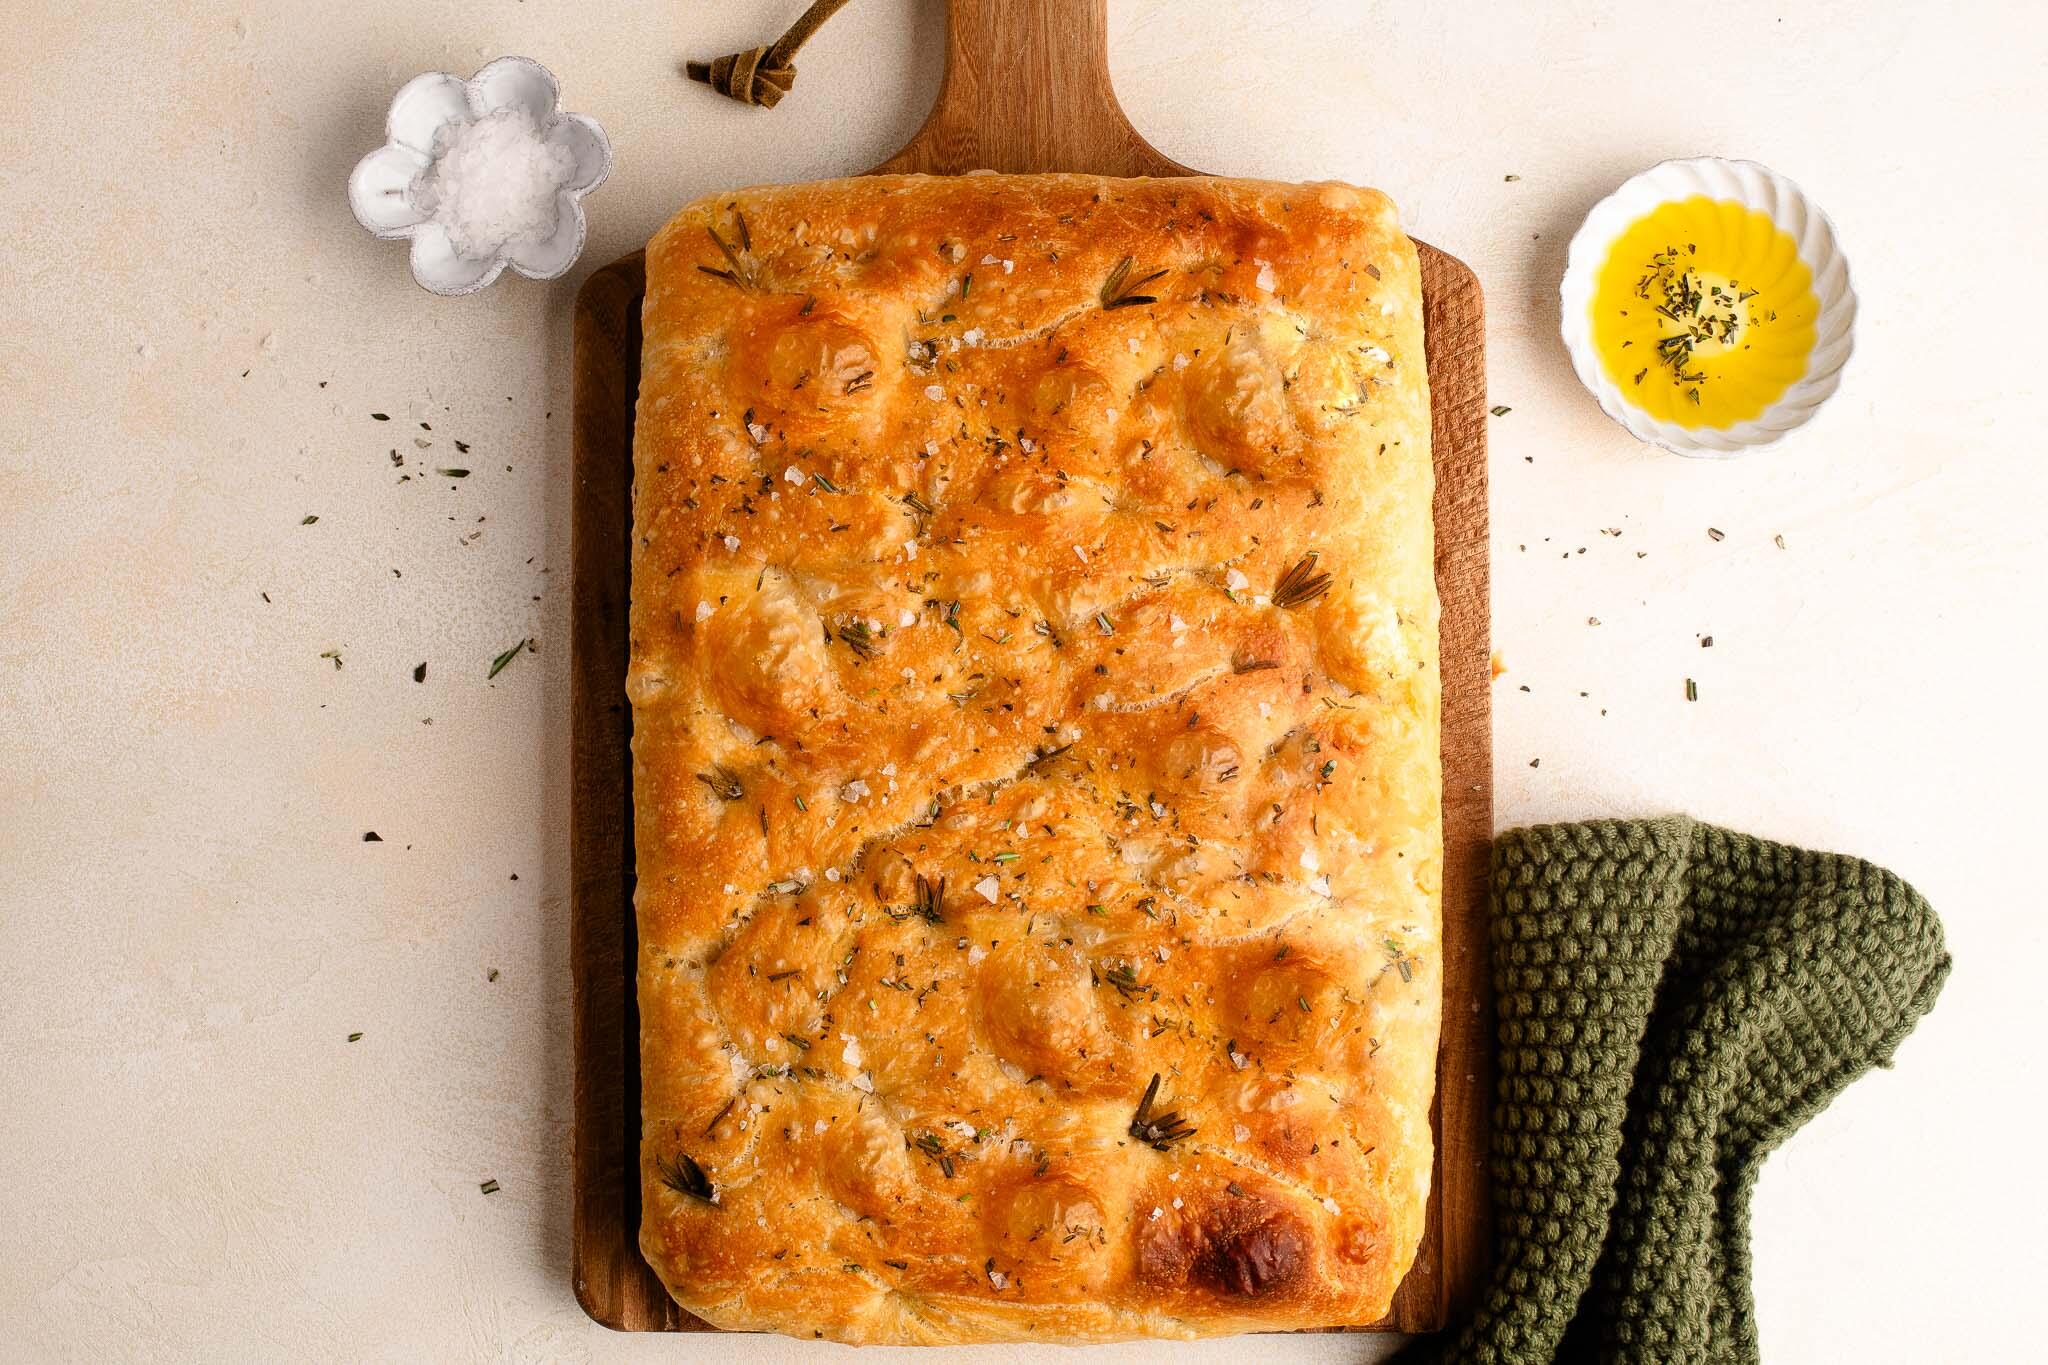
Drizzle 2-3 tablespoons of olive oil over the dough, and sprinkle with finely chopped rosemary.
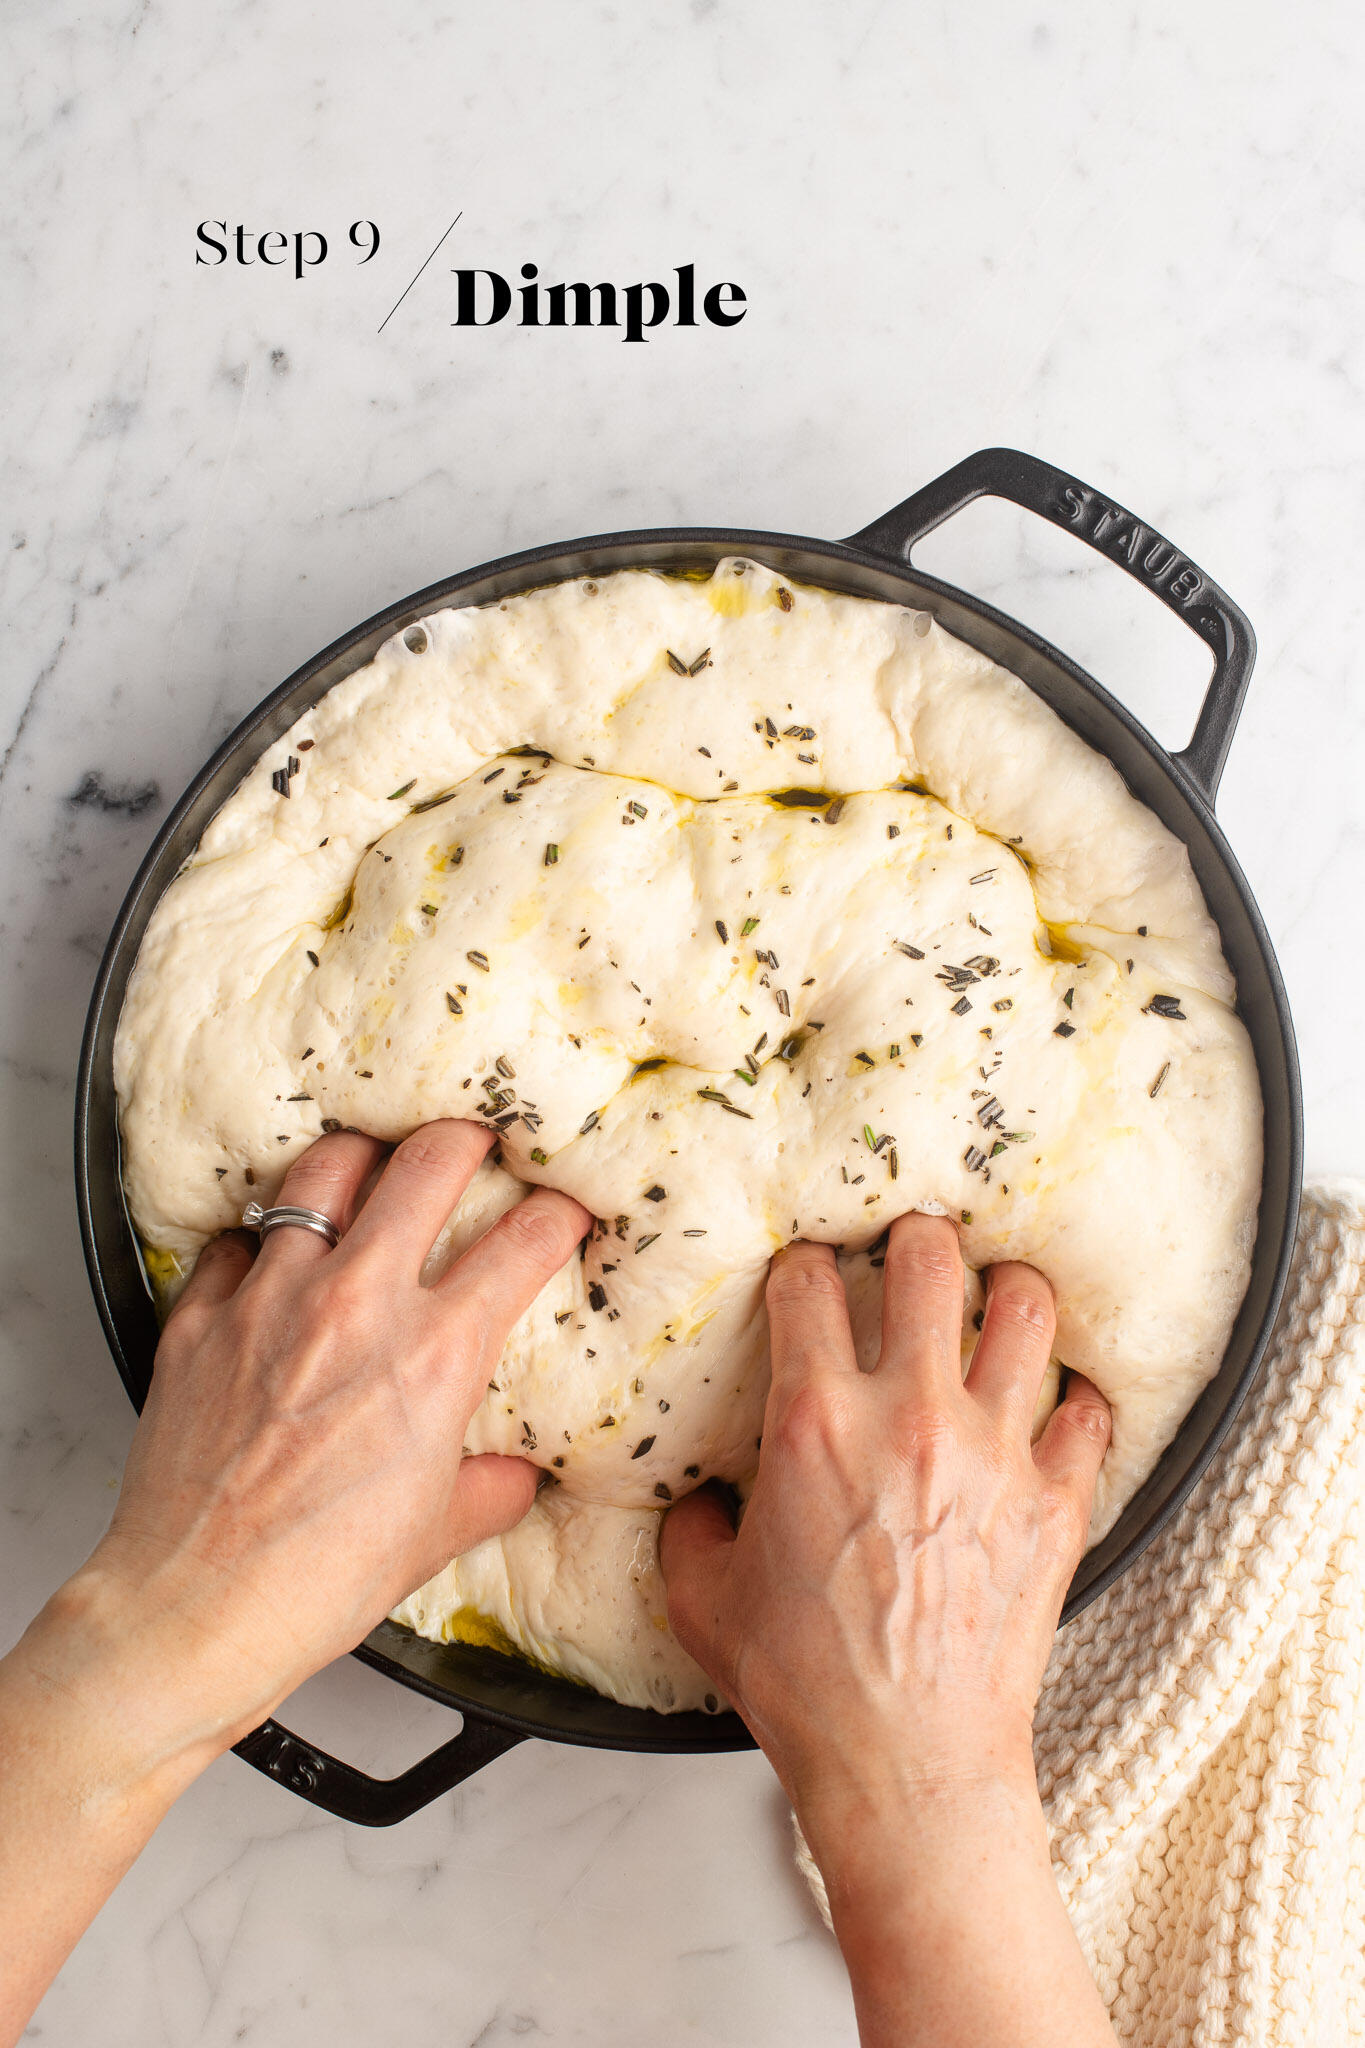
Step 9
Oil your fingers and fingers, after which press your fingers into the dough to depart indents. The dough will deflate as you accomplish that. Repeat till a lot of the dough is dimpled, however attempt to not take away too many air bubbles. Tuck in some rosemary leaves into the dimples, if you want. Sprinkle over sea salt flakes.
Step 10
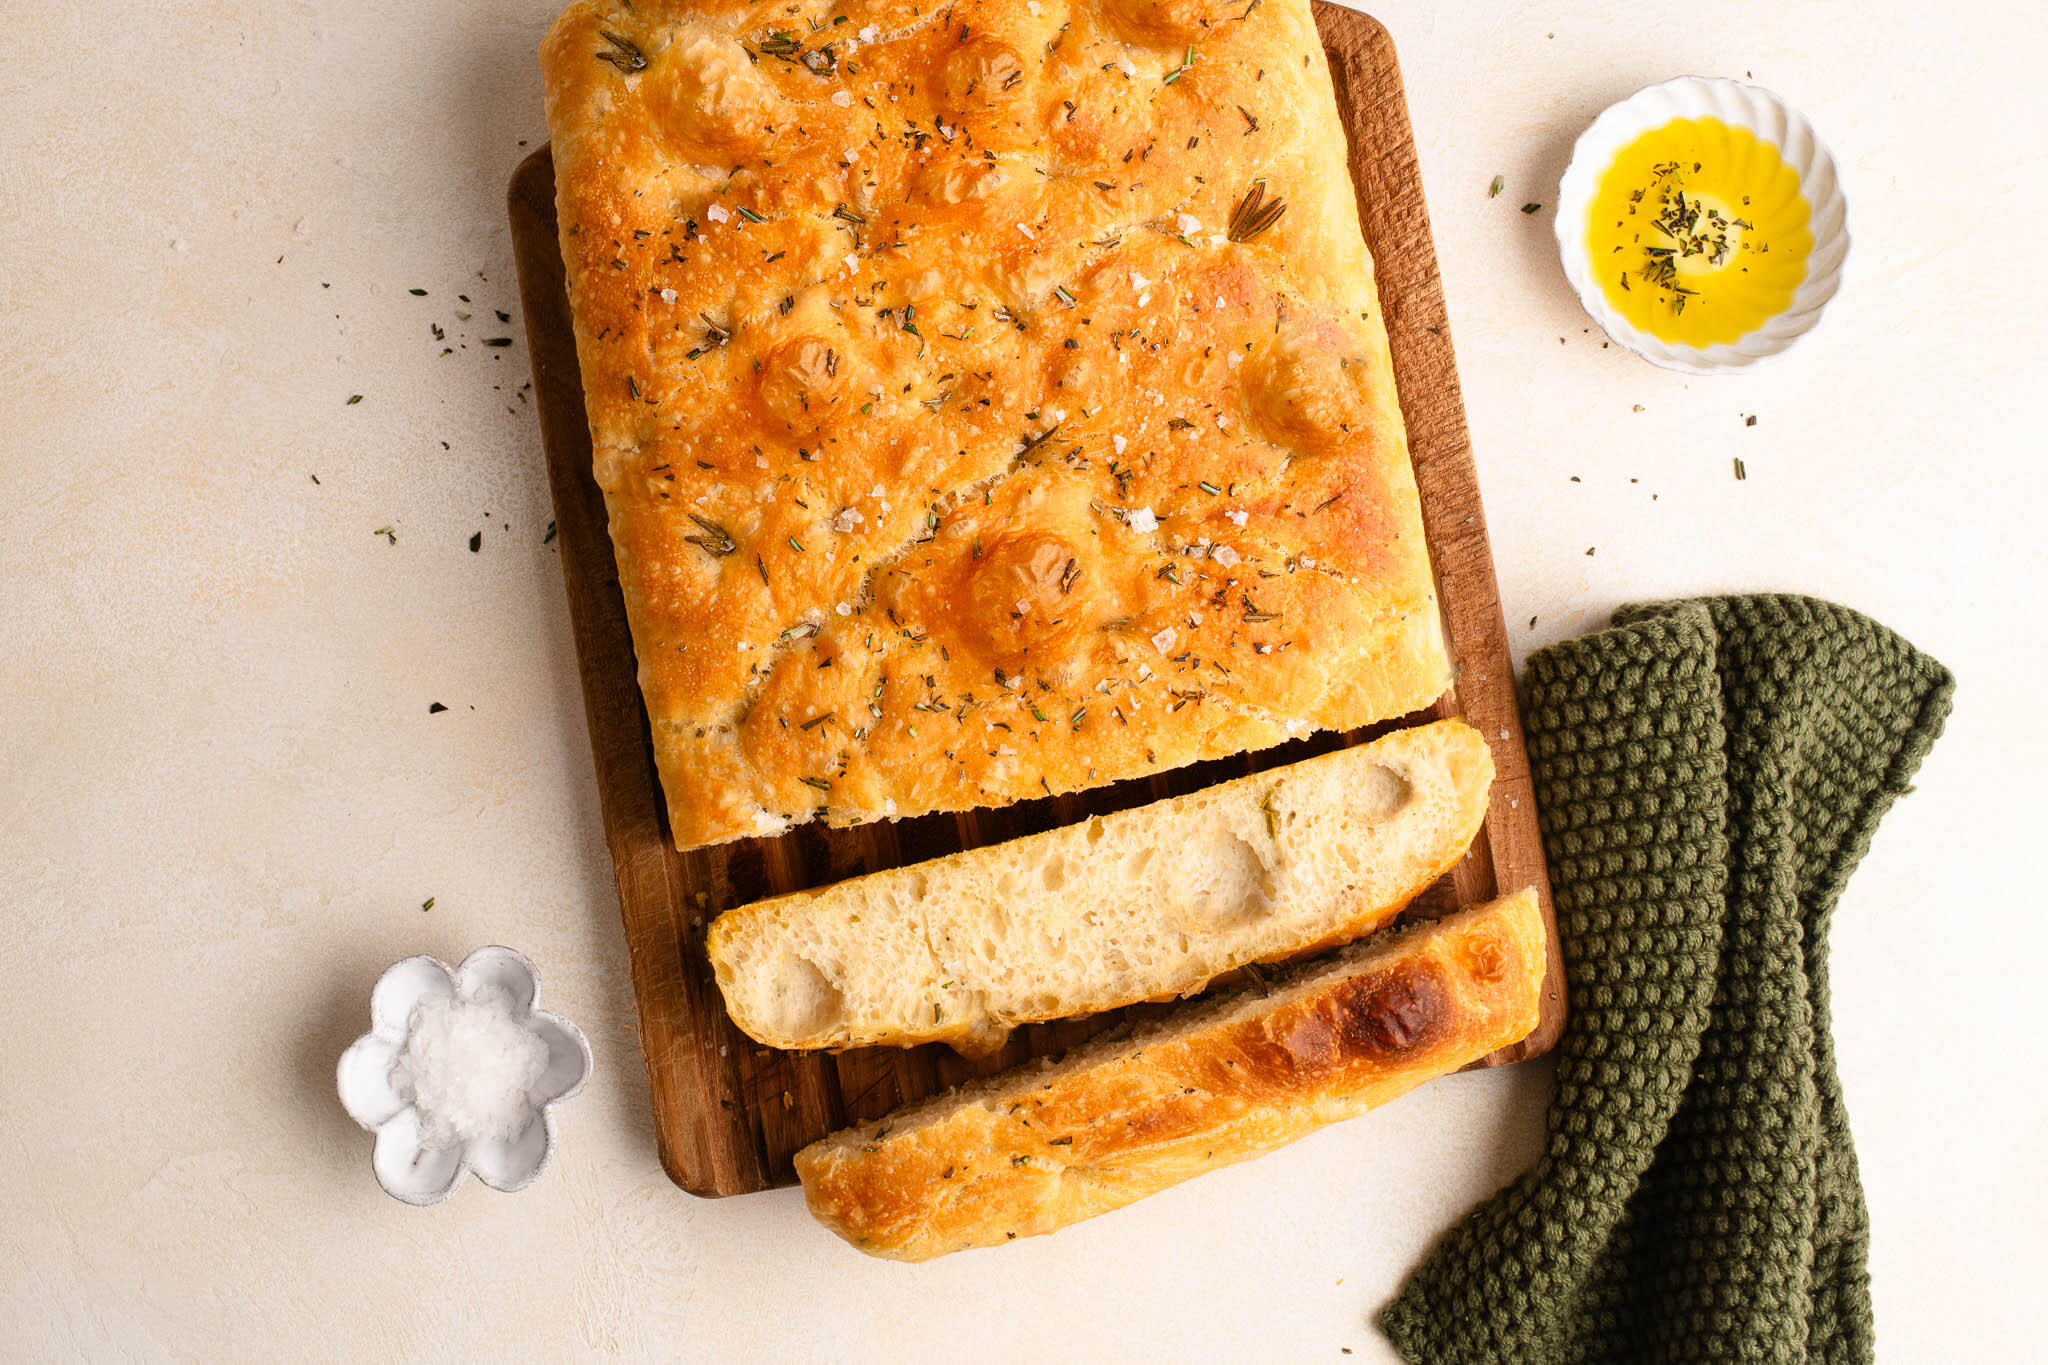
Bake the focaccia for 15-20 minutes, or till it’s properly golden on prime. Whether it is browning too rapidly, cowl the focaccia with a sheet of foil. Let the focaccia relaxation for about quarter-hour earlier than slicing and serving.

Ideas for Making Focaccia Dough Forward of Time
This focaccia recipe includes a little bit of ready time for the dough to proof at numerous phases – you will have to put aside about 4 hours to make and serve the focaccia. Regardless of the time dedication, little or no effort is required in your half at every stage.
As with most bread recipes, I sometimes make the dough the night time earlier than and permit it to rise slowly within the fridge in a single day. The longer proofing time has the additional benefit of permitting the dough to develop extra flavour and a greater texture. Come the morning, the dough can have not less than doubled in dimension, and it will likely be prepared for shaping as per the recipe. And for a focaccia which requires 4 rounds of proofing, I feel it is smart to start out the night time earlier than.
To make the dough the night time earlier than:
- Make the dough as per the recipe till you could have accomplished the Second Mini Proof.
- Cowl the bowl with plastic wrap or a reusable bowl cowl.
- Place the bowl into the fridge.
- Let the dough rise for the Third Proof in a single day, or for not less than 8-10 hours.
- The subsequent morning, the dough ought to have not less than doubled in dimension.
- Gently take away the dough from the bowl.
- The dough is prepared for shaping within the baking tray as per the recipe.
- Because the dough might be chilly from the fridge, the Fourth Proof might take barely longer.
Focaccia with Rosemary and Sea Salt

- Resting Time: 3.5 hours
- Prep Time: 20 minutes
- Cook dinner Time: 20 minutes
- Complete Time: 40 minutes
- Yield: Serves 4 to six
- Class: Bread
- Technique: Oven
- Delicacies: Italian
A basic Focaccia with Rosemary and Sea Salt which is ideal for appetisers or sandwiches. Recipe with step-by-step images for making a focaccia in a cast-iron skillet or in a baking pan.
Substances
For a Spherical Focaccia (see Kitchen Notes beneath for an oblong focaccia)
- 375 g (2 1/2 cups) bread flour
- 1 1/2 teaspoons immediate dried yeast (see Kitchen Notes)
- 1 1/2 teaspoons high quality salt
- 2 teaspoons caster sugar (superfine sugar)
- 315 ml (1 1/4 cup) heat water
- 1 tablespoon olive oil, for the dough
- 2–3 tablespoons olive oil, for the pan
For the Toppings
Directions
BEGIN THIS RECIPE ABOUT 4 HOURS BEFORE SERVING
To Make the Focaccia Dough
- Measure the flour, yeast, salt and sugar into the bowl of an electrical stand mixer.
- Calmly combine the dry substances along with the dough hook.
- Measure the water and 1 tablespoon olive oil right into a small measuring jug.
- Slowly add the moist substances to the dry substances.
- Knead the dough on low-medium velocity till the entire flour is mixed with the water. This step ought to take about 2 minutes.
First Mini Proof
- Cowl the bowl of dough.
- Place the bowl someplace heat for quarter-hour.
- Moist your fingers with some heat water.
- Pull up the dough from one fringe of the bowl, stretching it as you go up, and bringing it down in direction of the centre of the dough. You may both use your fingers or a spatula for this activity.
- Repeat this stretching movement with the remaining edges of the dough.
Second Mini Proof
- Cowl the bowl of dough once more.
- Place the bowl someplace heat for an additional quarter-hour.
- By now, the dough ought to have elevated in dimension.
- Repeat the stretching movement talked about within the First Mini Proof.
Third Proof
- Cowl the bowl of dough.
- Place the bowl someplace heat for 1 to 1.5 hours, or till the dough has doubled in dimension.
Fourth Proof
- Drizzle 2-3 tablespoons of olive oil right into a cast-iron skillet measuring 26 cm/10 inches in diameter. If you’re nervous concerning the focaccia sticking to the pan, you may also line the pan with baking paper first.
- Rigorously switch the dough onto the skillet.
- Fold the underside third of the dough in direction of the centre.
- Then fold the highest third of the dough in direction of the centre. It is best to now have a fats log of dough.
- Flip the dough over in order that the seam is going through down.
- Use your fingertips to softly push the dough out to nearly fill the pan.
- Cowl the dough with a clear tea towel and place the pan someplace heat for about 1 to 1.5 hours, or till the dough has nearly risen to the highest of the pan, and it has unfold to fill the pan (or a lot of the pan) with massive air bubbles.
To Adorn the Focaccia
- Preheat the oven to 220°C/430°F (with out fan).
- Place a steel baking sheet on the center shelf of the oven.
- Drizzle 2-3 tablespoons of olive oil over the dough.
- Sprinkle with chopped rosemary.
- Oil your fingers with some olive oil to stop the dough from sticking to your fingers.
- Use your fingers to make random indents within the dough, pushing all the best way to the underside. As you accomplish that, push out the dough to fill the baking tray, if essential.
- Sprinkle the dough generously with sea salt flakes.
- Adorn the dough nevertheless you want (resembling with rosemary twigs).
To Bake the Focaccia
- Bake for 15-20 minutes, or till the focaccia is evenly golden.
- I like to recommend ready about quarter-hour earlier than slicing the focaccia. This can enable the bread to relaxation, which is able to lead to a cleaner slice if you reduce it with a serrated knife.
- The focaccia is finest eaten on the identical day.
Kitchen Notes
 MAKE A RECTANGULAR FOCACCIA
To make an oblong focaccia, I take advantage of a non-stick baking pan which measures 23 x 33 x 5 cm/9 x 13 x 2 inches, and I enhance the recipe by 25% as follows:
500 g (3 1/3 cup) bread flour
7 g (2 teaspoons) immediate dried yeast (see Kitchen Notes)
2 teaspoons high quality salt
1 tablespoon caster sugar (superfine sugar)
400-420 ml (1 2/3 cup) heat water, about 40°C/105°F
1 tablespoon olive oil, for the dough
2-3 tablespoons olive oil, for the baking tray
 DIFFERENT TYPES OF FLOUR
* For Swiss readers: I take advantage of Zopfmehl (or farine pour tresse) when making bread and enriched dough.
 DIFFERENT TYPES OF YEAST
* Please word that there’s a distinction between immediate yeast (additionally referred to as immediate dried yeast or fast-action dried yeast) and dried yeast (additionally referred to as lively dry yeast). If you’re unsure what sort of yeast you could have, please test the packaging for directions on how you can use the yeast.
* With immediate yeast, you’ll be able to add it on to the flour combination with out having to activate it first.
* With dried yeast, you will have to activate it first (often in some heat liquid).
 PROOFING THE DOUGH
Dough wants a heat atmosphere for the yeast to activate and trigger the dough to rise. When you don’t have a heat place in your house, attempt one of many following concepts:
* Within the oven with the oven mild switched on (works just for some ovens).
* Within the oven with a tray of boiling water on the underside shelf.
* Within the oven at a low temperature of about 25-30°C (77-86°F).
 OVEN TEMPERATURES
All recipes on this web site state temperatures for a daily oven (i.e. a traditional oven with out fan). If in case you have a convection oven with a fan, please seek the advice of the producer’s handbook on how you can modify the temperature and baking time accordingly.
 CONVERSIONS
To transform from cups to grams, and vice-versa, please see this helpful Conversion Chart for Fundamental Substances.